
This is the next tutorial on the Nepali typing tutorial series. We have already written 4 articles on different ways to type Nepali on both PC and Mobile.
But today, in this article, we will specifically talk about Google Keyboard(Gboard) to type Nepali on your android smartphone.
Gboard is also available for iOs devices; at the time of writing this article, the Nepali language was not available, so today’s article is exclusively for Android users. But iOs users can also type Nepali using Gboard using the Hindi language; however, the features and flexibility are not as Android versions.
So, What is Gboard?
GBoard is a keyboard system developed by Google for smartphones. It is available for both Android and iOs. Gboard is a very handful keyboard for your smartphone, which provides many useful typing features. Those features are beyond what a typical Keyboard provides.
Today in this article, we will guide you to the use of Gboard to type Nepali for android phones and we will also explore its features for Nepali typing.
This tutorial is going to be very useful for everyone who wants to type Nepali using an android smartphone. That’s why read the whole article to understand the Gboard Keyboard application.
Now let’s get into the tutorial to use Gboard keyboard application for Nepali typing,
Set Up Gboard To Type Nepali On Your Android Smartphone
Download the Gboard
Before we learn anything about Gboard, we need to have it installed on our smartphones. As we already mentioned, the Gboard application is available for both Android and iOs.
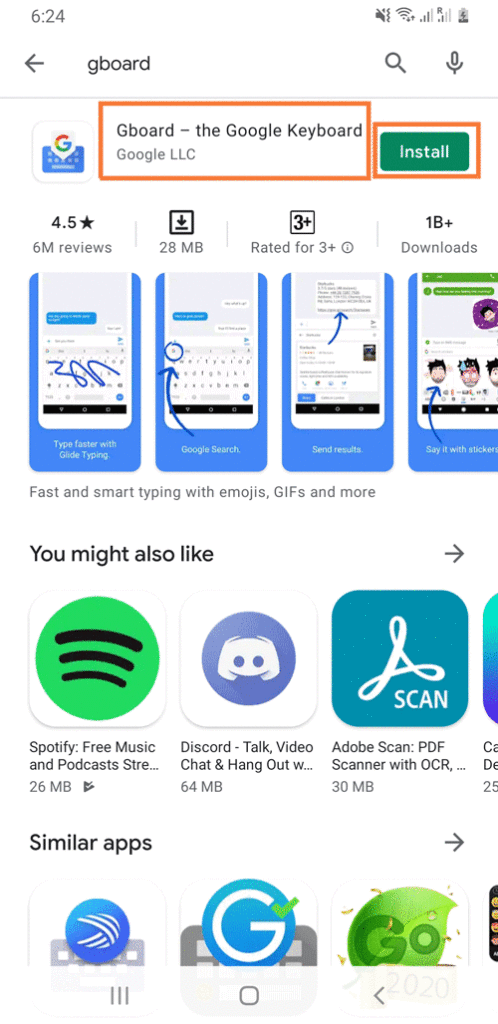
Gboard on Android Playstore-
Android users can get it in Google Playstore, or follow this link – Gboard – the Google Keyboard. If you follow this link it will directly redirect you to the play store’s Gboard application download page from where you can download. Or you can also search Gboard and download it manually from your Playstore.
Now Setup Gboard your Phone
After you downloaded Gboard on your smartphone, we have to setup it and make it default keyboard to use it.
Now we will learn how to make Gboard as your default keyboard for both android smartphone in stepwise,
Step to make Nepali keyboard on Gboard and make it defualt keyboard on Android smartphone-
Find and launch Gboard in Application Space
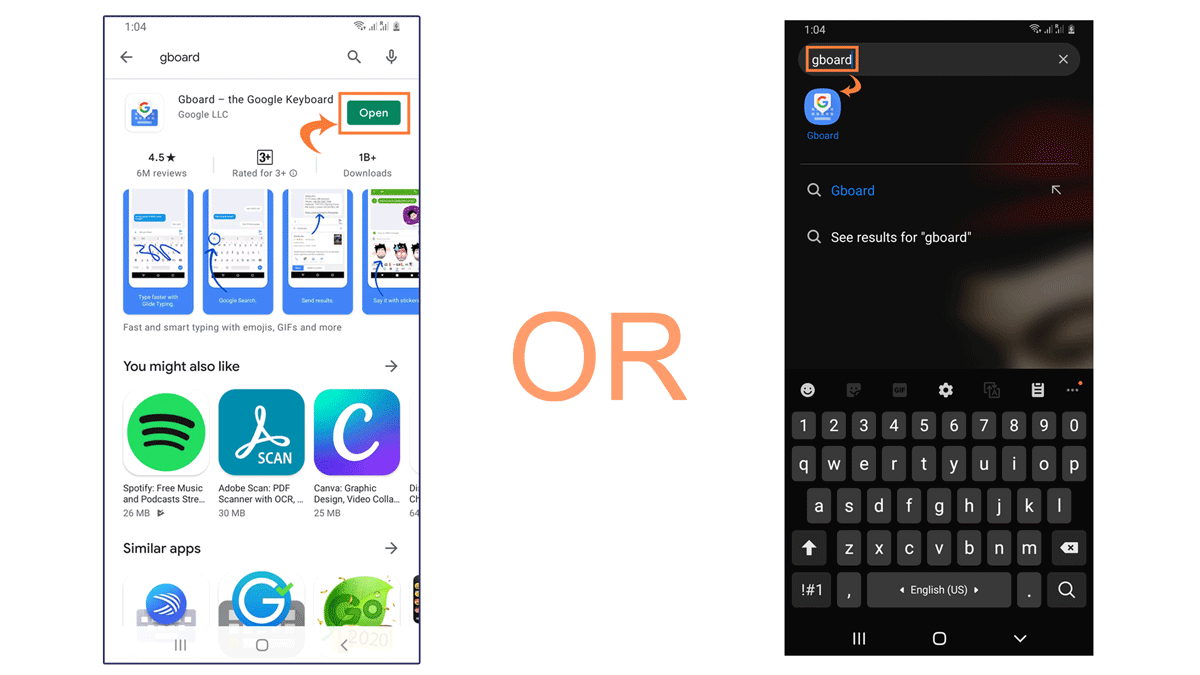
Find a freshly installed Gboard application in the application space of your smartphone and open it. If your smartphone supports the application search, you can directly search it. Some Android smartphone supports App search through the search bar in the Application space. Otherwise, you can also launch it via Google Playstore on Android just after installing it on your smartphone.
On Android-
Complete Step 1 and Step 2
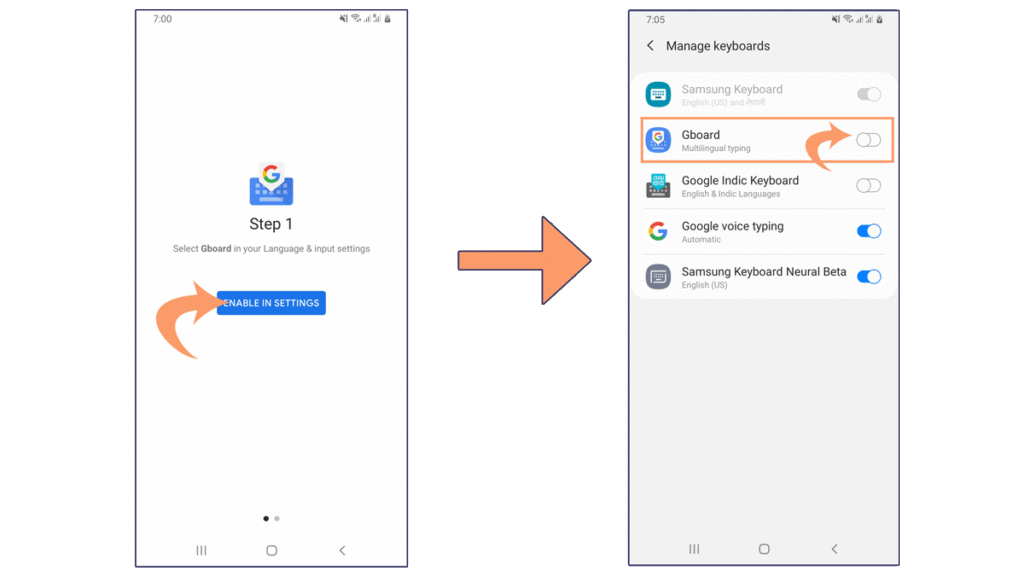
Step 1:
Once you open Gboard for the first time, it will prompt you to Enable Gboard in Settings in Step 1 in which you have to enable the Gboard multilingual typing keyboard.
These steps are shown using pictorial representation as follows-
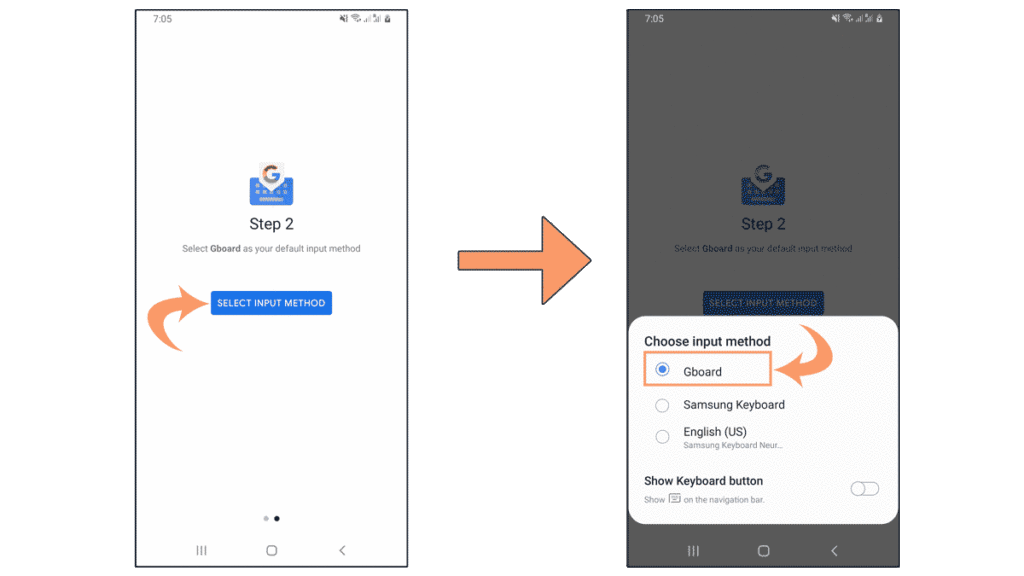
Step 2:
In Step 2, you will prompt to the SELECT INPUT METHOD button in blue color. You need to tap on this for keyboard setup for your android smartphone for Gboard. Then you will get the Choose input method option where you need to choose Gboard. This setup will make Gboard your default keyboard now. Now you will be in the main interfaces of Gboard, where you can set up several things.
These steps are shown using pictorial representation as follows-
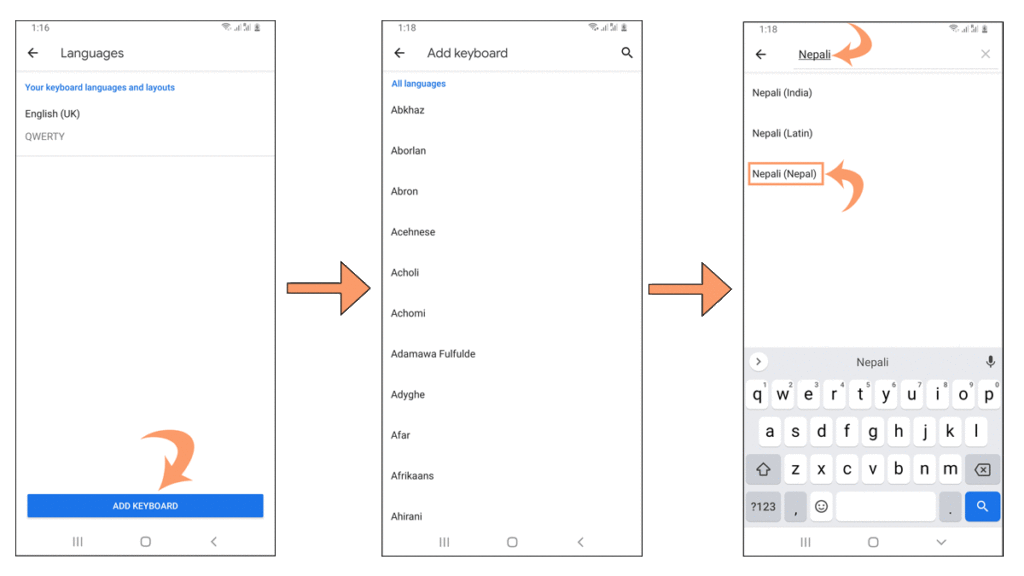
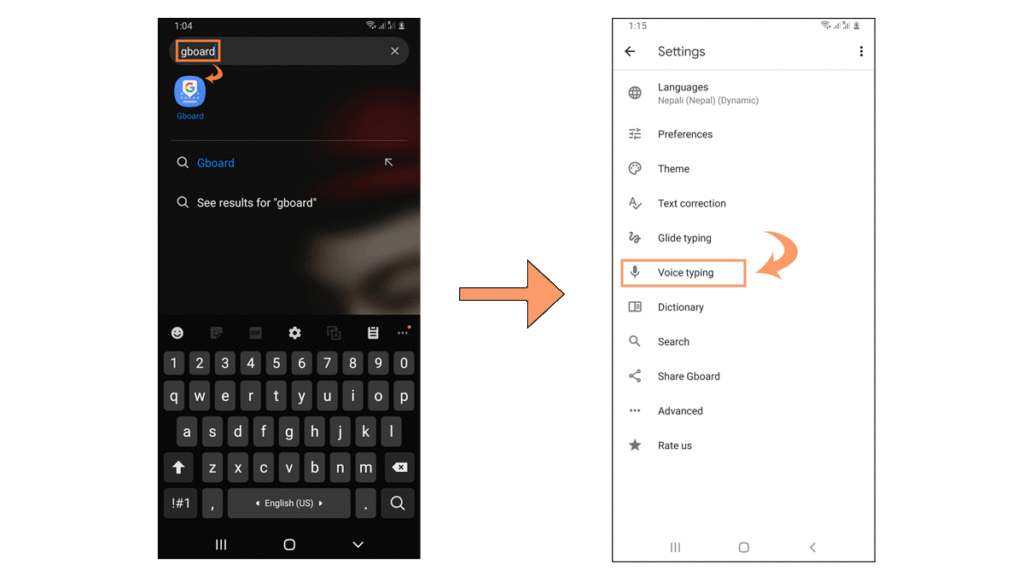
Tap on Languages
Now You can see the number of options available in Gboard settings. For Nepali typing, we have to add a Nepali keyboard to it. For this Tap on the Languages which appears at top of Gboard settings. After that you will see the ADD KEYBOARD button in blue color, tap on that. Once you tapped on that, you will see the list of different languages, but we have to choose Nepali(Nepal), so search it using the search bar and select it. And finally, tap on Done.
These steps are shown using pictorial representation as follows-
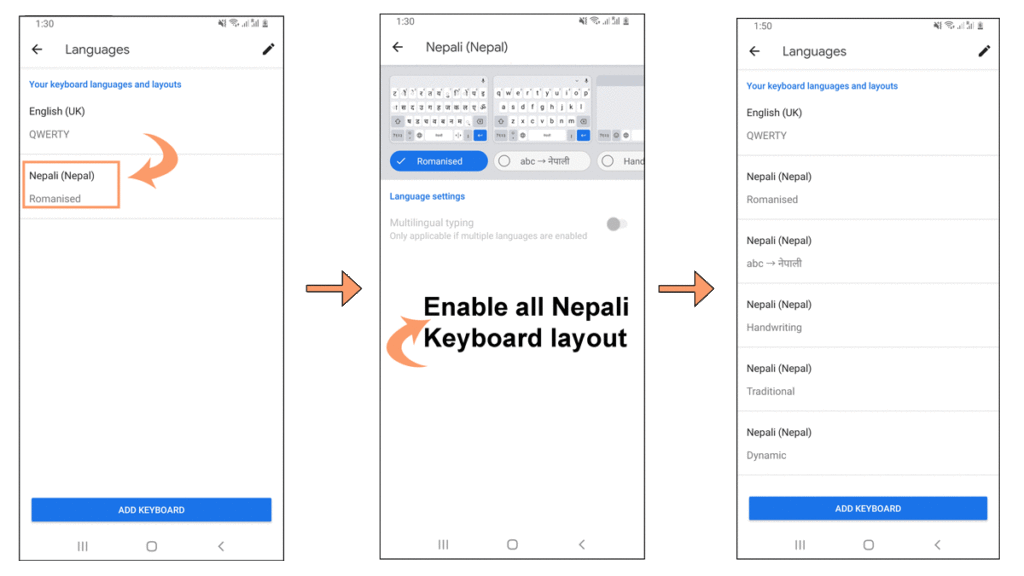
Setup Nepali Keyboard
Nepali Keyboard of Gboard is a combo pack of different keyboard which support different mode. It has 5 different Nepali keyboards. To enable all tap Nepali(Nepal) keyboard, you have just added your keyboard languages and layouts list. You will see 5 different Nepali keyboard layouts, namely, Romanised, abc –> नेपाली, Handwriting, Traditional, Dynamic. All these Nepali Keyword layouts have their own use. We are going to cover this later in this post.
These steps are shown using pictorial representation as follows-
How to use Gboard to type Nepali?
Till this point, we are all set up for Gboard to type Nepali on your android smartphone. Now we will illustrate how to use 5 different Nepali keyboards that we have just added in Gboard settings in the above steps.
Now to use this Nepali keyboard of Gboard, you open any application where there is a need for Nepali typing. For this tutorial, I am using Samsung Notes for demonstration. You can use any for your application.
Once you bring any application that needs a Keyboard, now you will see Gboard as your default Keyboard for your phone. This new keyboard will look like this-
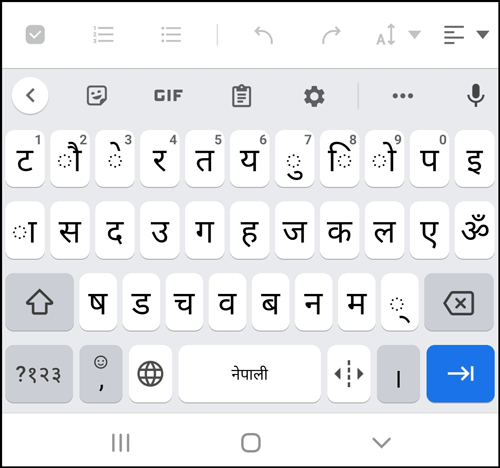
As we already added the Nepali Keyword with 5 different layouts for a different mode of use. Total we have 6 different keyboard layouts in our Gboard including English. We will demonstrate all of 6 different Nepali keyboard layout of this Gboard application to type Nepali,
Note- To change keyboard layout just tap to world icon which lies on bottom of your keyboad

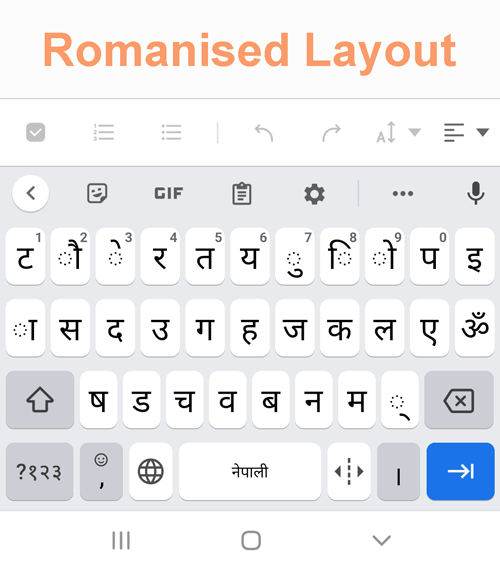
Romanised
In the Romanised layout of the Nepali Keyboard of Gboard, you can have Nepali characters in a Romanised manner. I assume You are familiar with the QWERTY keyboard format; in this format, we have the English alphabet in a different key position. In our Romanised layout of the Nepali keyboard, we have the Nepali alphabet in the QWERTY keyboard’s respective key position to facilitate Nepali Romanization. For example, in s, we have स; in d, we have द. Like that layout is formed to facilitate the Romanised Nepali for Nepali typing.
Romanised Nepali Keyboard layout look like this-
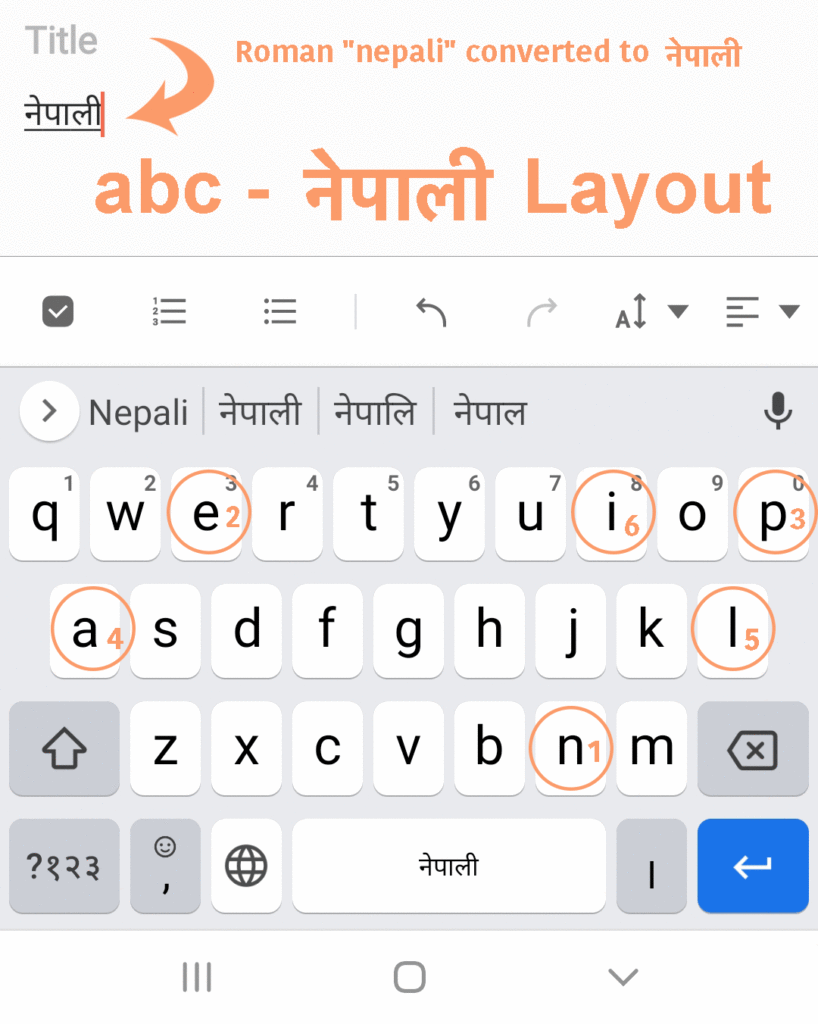
abc –> नेपाली
This abc–> Nepali is the second layout out of 6 different Nepali keyboard layout of Gboard. This is one handy for everyone. Using this layout, you can use a normal English QWERTY layout to type Roman Nepali. This layout will automatically translate those typed Romanized Nepali to true Nepali characters. Using this, you can easily type Nepali anywhere using your smartphone.
abc –> नेपाली keyboard layout look like this-
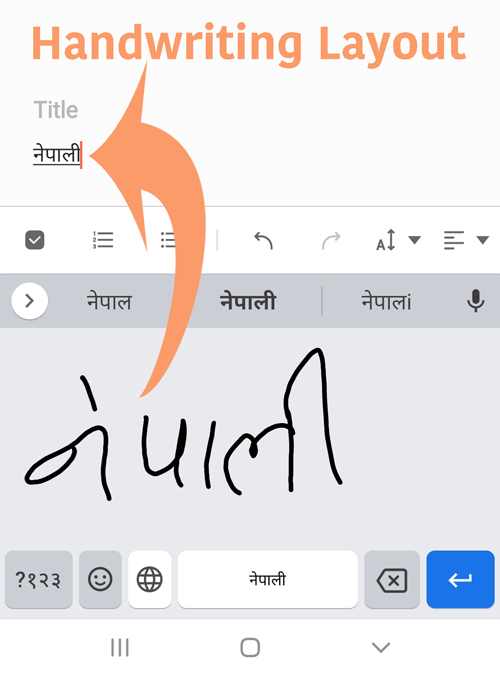
Handwriting
This another advanced feature that Gboard provides for Nepali typing on your smartphone. It next layout you have in your Nepali keyboard layout list. You will get a drawing area on this keyboard layout where you can draw Nepali characters and words. Those drawn characters are then converted to true Nepali characters and ready to use anywhere in your application. This one is a really cool feature that Gboard provides, and it also makes this application more accessible and handy. Anyone can type Nepali on their smartphone just by drawing Nepali characters on this layout’s drawing area. You are going to love these features.
Handwriting Nepali keyboard layout look like this-
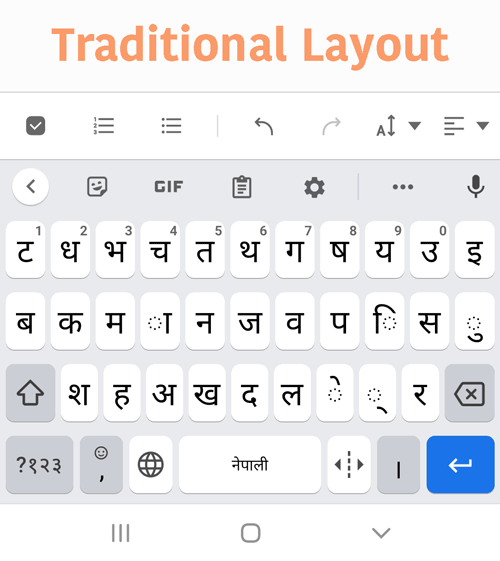
Traditional
Traditionally Nepali keyboard layout in Godard supports what other traditional Nepali keyboard layout offers. It has all Nepali alphabet position similar to old traditional keyboards, like the one you see on Typeshala and other original Nepali keyboard layouts. So if you are already familiar with such a traditional Nepali keyboard layout, this will be easier and familiar to you. Hence, you can easily type Nepali using your smartphone.
Traditional Nepali keyboard layout look like this-
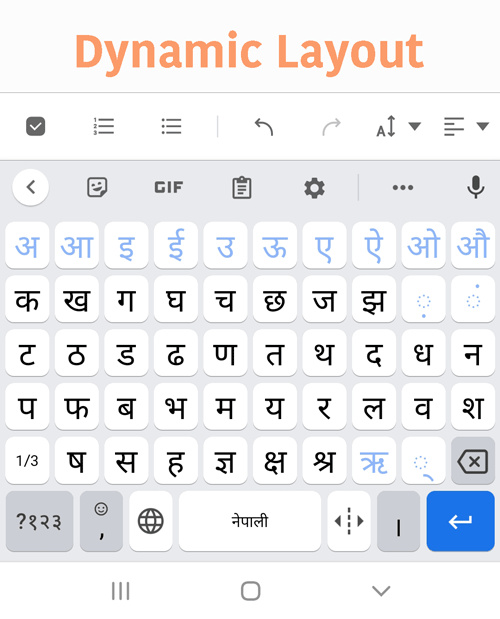
Dynamic
The dynamic Nepali keyboard layout of the Gboard application is a little unique from the other layouts. Nepali characters are placed in alphabetic order from QWERTY position as क ख ग घ, and in upper key rows, it has अ, आ, इ (Nepali vowels letters). This layout will be easier for all who want to type Nepali. They even don’t need to familiar with any other layout because every character is positioned in order on this particular layout
Dynamic Nepali keyboard layout look like this-
Another Exciting Feature of Gboard For Nepali typing…
Voice type for Nepali using Gboard
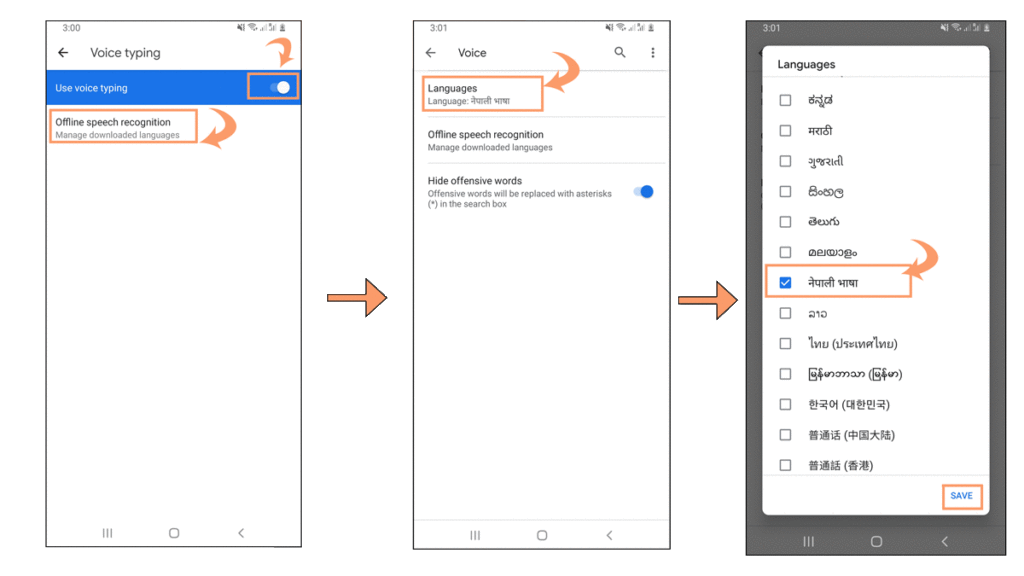
To enable this voice typing feature of Gboar to type Nepali, we have to set up a few things in Gboard settings. For this please follow the following steps-
Open Gboard
Now open Gboard application from your smartphone where we will enable and setup voice typing features of Nepali typing
Tap on Voice typing
Once you opened the Gboard, you see many options where ‘Voice typing’ is one. Now tap on this ‘Voice typing’ option. Once you are in Voice typing, you will see the ‘Use voice typing’ setting under that. Now you enable it by toggling it on. After this, tap on the ‘Offline speech recognition’ option, which lies just below the ‘Use voice typing’ option. After this, you will be able to see Languages, now tap on that and find and select Nepali vasa out of the long language list. If any other language is already selected, then unselect the previous language; otherwise, you will not be able to use voice typing for Nepali.
These steps are show here-
Now Type Nepali using Voice typing feature
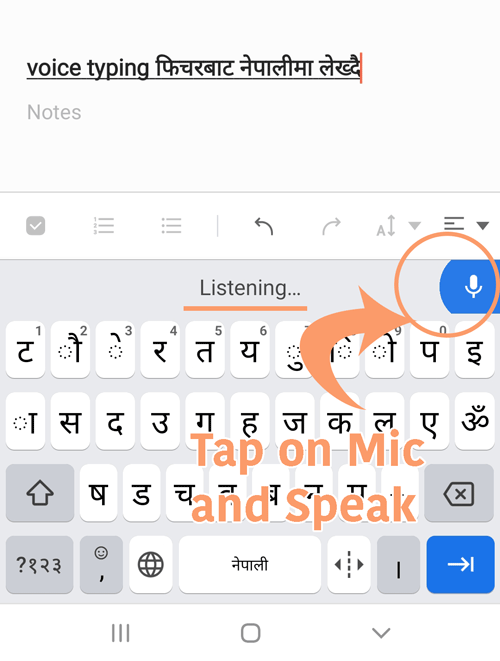
Once you are done with all these, you come out of this Gboard settings, and now you are ready to demonstrate this voice typing feature for Nepali. Open any application where you need to type Nepali.
Again for this demonstration, I am using Samsung Notes. Once you see Keyboard, you tap on the ‘Mic’ option which lies at the right top corner of your keyboard. Once you tap, just keep speaking then simultaneously your Godard application translates those spoken Nepali words to written Nepali characters in realtime.
This Nepali voice typing demonstration is shown here-
At the point of writing this article, the Nepali voice typing feature is currently available online only. So that you need an active internet connection to use features. But for few other languages English, Hindi, Gboard already support offline voice typing features; for this, you need to download an offline recognition pack from Gboard Voice typing features settings.
Conclusion
In this article, we learned how to type Nepali on a smartphone using Gboard mobile application. We demonstrated the setup procedure and its application for Nepali typing for Android phone in a detailed stepwise manner. In the end, we also demonstrated a way to use Gboard for Nepali voice typing. As we said in begnning, Gboard is also avaialbe for iOs, but due do unavilablity of Nepali language currently, use should use Hindi to type Nepali. Due to this it not as flexible and accesible as Android version specially to type Nepali.
We hope you understood all the steps to use Gboard on your smartphone and use it for Nepali typing. Gboard is a handy keyboard tool made by Google. You can type Nepali, and you can also use it for many other languages with advanced features like handwriting typing and voice typing.
If you still have doubts and confusion about any of the above demonstration steps, then leave a comment below. We will try to address your issue and problem as soon as possible. And if you like this post, then don’t forget to share it with friends and relatives. For more tutorial posts like this, don’t forget to subscribe to our website and stay tuned with Geekymaster.


